User guide for running RNode
- Kelly Foster
- Daniyar Itegulov
- Sebastian Bach
Introduction
Nodes are the basis for the RChain network. The network layer is the lowest level component in the architecture that will eventually support RChain’s large-scale blockchain operations. Pre-release versions of RNode are available for users to explore. More information about the roadmap, key milestones and release plans is available at https://developer.rchain.coop.
Who is this guide for?
This document is a quick start guide for users to install and run the software for the purpose of evaluating Rholang and/or using the RChain public testnet. Detailed information about the the software for users and developers is available in on https://github.com/rchain/rchain.
Network configuration
By default RNode continuously attempts to connect to other peers. Successful connection to other nodes on the RChain network requires connectivity support from your network. Please see RNode supported network configuration and configure your network.
Installing RNode
We deliver RNode software in a variety of installation packages. Installation packages are available at both https://developer.rchain.coop and https://github.com/rchain/rchain/releases. We recommend using the latest release.
Note: In the command examples below, you must update based on the version number of RNode you want by replacing "x" with the numbers in your installation version.
Linux
| Platform | Package type | Installation information |
|---|---|---|
Debian 9 Stretch Ubuntu 16.04 LTS Ubuntu 16.04 LTS | Debian Package (.deb) | First time installation: apt install ./rnode_0.x.x_all.deb Re-installation: systemctl stop rnode && apt remove rnode && rm -rf /var/lib/rnode/rspace && apt install ./rnode_0.x.x_all.deb |
Fedora 27 Fedora 28 | RPM Package (.rpm) | First time installation: dnf install ./rnode-0.x.x-1.noarch.rpm Re-installation: systemctl stop rnode && dnf remove rnode && rm -rf /var/lib/rnode/rspace && dnf install ./rnode-0.x.x-1.noarch.rpm |
| Other Linux distributions | Tarball (.tgz) | Prerequisites
First time installation: tar -xvf rnode-0.x.x.tgz |
Mac
| Platform | Package type | Installation information |
|---|---|---|
| Mac | Tarball (.tgz) | Prerequisites
First time installation: tar -xvf rnode-0.x.x.tgz cd rnode-0.x.x ./macos_install.sh Note: The macos_install.sh script installs the Homebrew package manager on your machine and then installs libsodium. |
Windows
RNode does not run in a native build or with Docker. Please see comments in CORE-637 - Getting issue details... STATUS for full details. The best way to use RNode in Windows is to install Ubuntu/Centos VM in Hyper-V and use the installation instructions for Linux.
Docker
Although it is simple to install RNode in Docker, it is important to have an understanding for working with Docker to successfully run and interface with RNode.
- If you are brand new to working with Docker, read the Docker get started documentation.
- If you a familiar with Docker, you may find it helpful to review or have ready access to the cheat sheets published at the end of each section of the Docker get started documentation.
docker pull rchain/rnode
ARM
You can run RNode on Raspberry pi. An example of this, including installation and deployment instructions, is available at https://github.com/kayvank/arm-rnode.
Running RNode
Run commands (non-Docker)
To connect to an existing network
rnode run --network <network ID> --map-size 1099511627776 --bootstrap "rnode://25a48e34b10c5917aa21bdbbf45da56d3e7129c6@node0.testnet.rchain-dev.tk?protocol=40400&discovery=40404"
--network ...- Network ID, used to differentiate between multiple RChain networks. The current network ID is posted on RChain public testnet information--bootstrap ...- Address of the bootstrap node you want to connect with. The bootstrap node of Public Testnet address isthe RChain public testnet.rnode://25a48e34b10c5917aa21bdbbf45da56d3e7129c6@node0.testnet.rchain-dev.tk?protocol=40400&discovery=40404.--map-size 1099511627776- LMDB map size. This is an interim solution until the sufficient size is set automatically.
To run a standalone node
rnode run -s
Run commands (Docker)
Create a RNode network
If this is your first time running RNode, you need to create a Docker network to support RNode operation. Unless you wipe your Docker system, you only need to do this once.
docker network create rnode-net
Create the data directory
Running RNode with Docker requires the /var/lib/rnode directory. Each Docker container has to have its' own data directory. If you have multiple directories on your system, you can specify them separately in your docker run command.
mkdir $HOME/rnode
To connect to an existing network
docker run -it --rm --network rnode-net --name rnode1 -v $HOME/var/rnode1:/var/lib/rnode rchain/rnode:latest run --bootstrap "<bootstrap node address>" --map-size 1099511627776
Note: Docker for Mac will only work with static NAT and port forwarding. network=host does not work on Mac. See RNode supported network configuration for more information on static NAT and port forwarding.
- Bootstrap address - Enter the address of the bootstrap node you want to connect with. See RNode bootstrap addresses for bootstrap nodes supported by the RChain core development team.
- Validator private key - Insert the key if you are a validator of test net, or if you are creating a private network and have a bonds file included in your genesis block.
- Network configuration - If you want to specify your ports, include --p in the run command. If you want to specify your host, include --host in the run command.
To run a standalone node
docker run -u root -it --network rnode-net --name rnode-server-local -v "$HOME/rnode":/var/lib/rnode rchain/rnode:latest run --standalone
Tips for working with RNode in Docker
Naming Containers
Once the network is created, the server container will be put into the network, and then referenced by the client. It's easier if you give your server container a name. This is an example of of naming a server 'rnode-server-local'.
docker run --name rnode-server-local rchain/rnode:latest
Using the --host flag
If you want to create a local docker network which consists of some nodes and a bootstrap node, you will have to specify the nodes' addresses with the --host flag. Make sure to not use the nodes' IP addresses for the --host flag. Instead use the hostnames. If the network is called 'rnode-net' and you named a docker container 'rnode-server-local', the hostname of that docker container is 'rnode-server-local.rnode-net'.
Sharing directories with containers
To share a directory with a container use the volume command. You will need to create a directory on your local system that will store all of the RNode related files. Once the directory is created, you can share this directory with the Docker container by using the volume command. Below is an example of how the volume parameter can be specified as part of a run command.
RNode requires the path /var/lib/rnode exist on startup. Each instance of RNode requires its own separate /var/lib/rnode directory.
docker run -v "path to local directory":/var
The RNode user interface
Calling the API
The RNode API is a server side API. To access the local RNode server once you have RNode running, open a new window and invoke the RNode api with:
rnode <API call>
Calling the API from a remote server
You can call the API of a remote RNode server by specifying the host server and host server port.
| Option | Description | Syntax | Argument Format |
|---|---|---|---|
| Host Server | The IP address of the server that will receive the call | --grpc-host | 100.10.25.75 |
| Host Server port | The port for the gRPC API on the server listening for calls | --grpc-port | 40401 |
This is an example of an API call to a remote server
./bin/rnode --grpc-host IP.Address.of.server --grpc-port 40401 repl
Available API Calls
With RNode running, use --help to see available commands and subcommands.
Find your node address, version, and peer count
You can ask RNode to provide its status to report the RNode address, version, and peer count.
curl -s http://localhost:40403/status
Report status in Docker
sudo docker exec -ti <containername> curl -s http://localhost:40403/status
Example of a status request response
{"address":"rnode://4fa269b79e781af2c079713772cfc5dbd7dc1569@52.119.8.64?protocol=40400&discovery=40404","version":"RChain Node 0.9.4.git8a4c9939 (8a4c99394c3a22831c2eadef7cdde7dec35238d7)","peers":7,"nodes":44}
RNode offers two types of counts of peers. peers are the number of nodes you are connected to via the Kademlia protocol and the ones that are able to pass messages such as blocks. nodes are the number of nodes found as part of node discovery.
Get a count of blocks in the DAG
Use this command to show the number of blocks in the DAG according to your node.
rnode show-blocks
Get a count of blocks in Docker
docker run -it --rm --network rnode-net --name rnode -v $HOME/var/rholang:/var/ rchain/rnode:latest --grpc-host rnode2 show-blocks
Generate a public/private key set
You can use the RNode software to generate either a secp256k1 public/private key set to use when deploying Rholang or in other scenarios where providing keys is a requirement. With the release of RNode v0.9.7 the platform uses the secp256k1 algorithm.
rnode keygen --algorithm secp256k1 --private-key-path <arg>
Deploy a Rholang contract
Deploy a Rholang source file to Casper on an existing running node. The deploy will be packaged and sent as a block to the network depending on the configuration of the Casper instance.
The deploy command requires the following specifications in addition to the Rholang file:
      --phlo-limit  <arg>                 The amount of phlo to use for the
                                          transaction (unused phlo is refunded).
                                          Must be positive integer.
      --phlo-price  <arg>                 The price of phlo for this transaction
                                          in units dust/phlo. Must be positive
                                          integer.
      --private-key-path  <arg>           The deployer's file with encrypted
                                          private key.
Deploy a Rholang contract to a known validator
Unless you are a validator in the RChain network or a private network, you will typically deploy Rholang to a known validator with the intent to add the contract to the blockchain.
rnode --grpc-host <address of known validator> deploy --phlo-limit <value> --phlo-price <value> --private-key-path <path to encrypted private ke> <path to .rho file>
Deploy a Rholang contract to a known validator in Docker
docker run -it --rm --network rnode-net --name rnode-deploy1 -v $HOME/var/rholang:/var/ rchain/rnode:latest --grpc-host <address of known validator> deploy --from "0x1" --phlo-limit <value> --phlo-price <value> --private-key-path <path to encrypted private key> <path to Rholang file>
Deploy returns a DeployID
A successful deploy returns a DeployID. You can use this ID to locate your deploy in a proposed block.
For example:
Here is a deploy made from an observer node to a validating node on a testnet
root@kelly:~# rnode --grpc-host node1.devnet.rchain-dev.tk deploy --phlo-price 10000000 --phlo-limit 1 --private-key-path /keys tut-philosophers.rho
Password for private key file: ******
Response: Success!
DeployId is: 3045022100bbabe879eed9194ef371f312b0fa36d402409111d307a1cb01cc8c519fdb741502206051ecfcd79aad31764ab7b65ceec4c537489ea7359fc8f80472e74c819b4cb1
Once we hav the DeployID, we can locate the block containing that deploy.
root@kelly:~# rnode --grpc-host node1.devnet.rchain-dev.tk find-deploy --deploy-id 3045022100bbabe879eed9194ef371f312b0fa36d402409111d307a1cb01cc8c519fdb741502206051ecfcd79aad31764ab7b65ceec4c537489ea7359fc8f80472e74c819b4cb1
blockInfo {
blockHash: "2b7848babd7ea4bee52bd7e9990a5119a98b9482ac28e5e9b181bbf1a480d8bf"
blockSize: "35679"
blockNumber: 315
version: 1
deployCount: 2
tupleSpaceHash: "d7aa5b8e0a9a6bf1bbfd3f19715ad08996b5fdde8eb64200763a742d1f348ea7"
timestamp: 1560208996576
faultTolerance: -1.0
mainParentHash: "fb17569ab340486e2bcfb33910a87ea30f598288af2c420397f055f03b2687ec"
parentsHashList: "fb17569ab340486e2bcfb33910a87ea30f598288af2c420397f055f03b2687ec"
parentsHashList: "9100f449f0fa3501fc058eb78534545f27d79503366078033c33625636391604"
sender: "0443a5170db3ec242341864617f752a0e54d34213793b96c5708db72ce62a75e1a37af8f1dcb93b208fe807f408a30f6acd343330a5d27b3434c759ac5d231679f"
If the deploy has not yet been proposed in a block, you will receive the following:
Couldn't find block containing deploy with id:3045022100bbabe879eed9194ef371f312b0fa36d402409111d307a1cb01cc8c519fdb741502206051ecfcd79aad31764ab7b65ceec4c537489ea7359fc8f80472e74c819b4cb1
Propose a block to the blockchain
Propose triggers a block proposal to the network. This is a function only available to validating nodes.
Example of the propose command on the server side
root@salt:~# rnode propose
21:52:06.959 [main] INFO  c.r.n.configuration.Configuration$ - Starting with profile default
Response: Success! Block c0b68d2520... created and added.
Here is an example of the console output following the propose. The log shows the new fork-choice from the proposed and added block (c0b68d2520...).
21:52:08.806 [grpc-default-executor-55] INFO  c.rchain.casper.util.comm.CommUtil$ - CASPER: Beginning send of Block #1 (c0b68d2520...) -- Sender ID 3d86379153... -- M Parent Hash 06eb7dc6ab... -- Contents 16d7c61fa6...-- Shard ID rchain to peers...
21:52:08.820 [repl-io-141] INFO  c.rchain.casper.util.comm.CommUtil$ - CASPER: Sent c0b68d2520... to peers
21:52:08.820 [repl-io-141] INFO  c.rchain.casper.MultiParentCasper$ - CASPER: Added c0b68d2520...
21:52:08.844 [repl-io-141] INFO  c.rchain.casper.MultiParentCasper$ - CASPER: New fork-choice tip is block c0b68d2520....
Propose a new block in Docker
docker run -it --rm --network rnode-net --name rnode-propose1 -v $HOME/var/rholang:/var/ rchain/rnode:latest --grpc-host rnode1 propose
Check if a block is finalized
Use this command to check if a block with the given blockhash is finalized
rnode is-finalized <blockhash>
Here is an example of the console output following the is-finalized call.
$ rnode is-finalized f893a2ef3c9d69a0d8b2a660453abe0002628769c51f11af4d720e56c43a96d7
Block is finalized
Bonding to a network to become a validator
To participate in the RChain proof-of-stake consensus protocol, you must stake bond on the network to become a bonded validator. Information about this process is not yet available.
Creating a private blockchain
You can create your own blockchain network.
Prerequisites for a private blockchain
- 1 bootstrap node
- 2 other node instances running on a network where they can communicate with each other (peers of each other).
- Keys for the node instances (these will be required for signing and creating the bond.txt file)
- A bond.txt file accessible by all node instances. You can either supply it, or use the system generated bonds file.
- A Rholang file to deploy across the network.
Steps to create a private blockchain
- Start the bootstrap node. This is the 1 node operating in standalone mode.
- Include the address of the bootstrap node in your run command for the peer nodes.
Joining the RChain test net
You can join the RChain test net. Please see RChain public testnet information for details about the version of software and the bootstrap address.
Monitoring the Node
RNode features integration with Prometheus. These instructions describe a method for getting started with RNode metrics collection and display using Prometheus via Docker-compose.
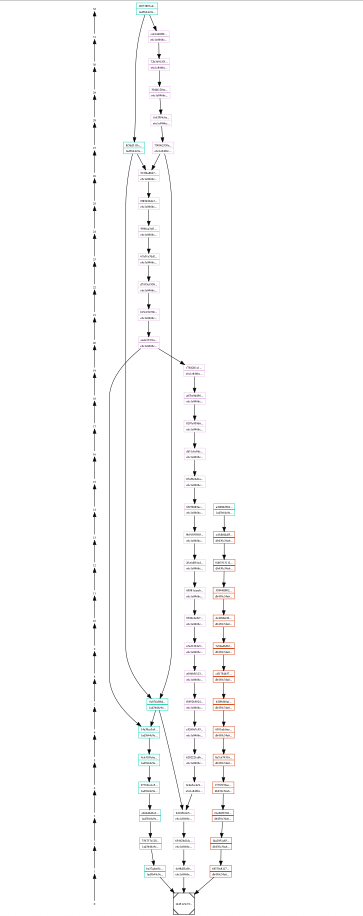
Visualizing the blockchain
To support debugging we have a process to collect information from the node and use it in graphviz to create a visualization of the DAG. Below are instructions for two methods for using this tool.
Visualizing the blockchain when there are >6,000 lines
Once an active network has been running for a few hours, your call to vdag will likely generate >6,000 lines of output. In this scenario, you will need to have installed the Graphviz software and use it to create a .png file. Please see https://www.graphviz.org/download/ for information about installing and running Graphviz.
Once installed use the following command to generate a .png file based on vdag output.
rnode vdag | dot -Tpng >vdag.png
Visualizing the blockchain when there are <6,000 lines
| Instruction | Example/illustration |
|---|---|
| Run the program in RNode | rnode vdag |
| Observe the generation of the graph text and copy the output | digraph dag {
rankdir=BT
node [width=0 height=0 margin=0.03 fontsize=8]
subgraph lvl0 {
rank=same
"0"
"14451c5c72..." [shape=Msquare]
} subgraph lvl1 {
rank=same
"1"
"be37ade65c..." [color="#1ad3b4" shape=record label="{be37ade65c...|1ad3b44c9e...}"]
"4c98df3a00..." [color="#e6c1e8" shape=record label="{4c98df3a00...|e6c1e846bc...}"]
"48370c8117..." [color="#db430c" shape=record label="{48370c8117...|db430c34a6...}"]
}
"be37ade65c..." -> "14451c5c72..." []
"4c98df3a00..." -> "14451c5c72..." []
"48370c8117..." -> "14451c5c72..." []
subgraph lvl2 {
rank=same
"2"
"754737e128..." [color="#1ad3b4" shape=record label="{754737e128...|1ad3b44c9e...}"]
"65462bd1dc..." [color="#e6c1e8" shape=record label="{65462bd1dc...|e6c1e846bc...}"]
"fda2951a85..." [color="#db430c" shape=record label="{fda2951a85...|db430c34a6...}"]
}
"754737e128..." -> "be37ade65c..." []
"65462bd1dc..." -> "4c98df3a00..." []
"fda2951a85..." -> "48370c8117..." []
subgraph lvl3 {
rank=same
"3"
"e664d6d3e6..." [color="#1ad3b4" shape=record label="{e664d6d3e6...|1ad3b44c9e...}"]
"b2185fefe5..." [color="#e6c1e8" shape=record label="{b2185fefe5...|e6c1e846bc...}"]
"21e840b706..." [color="#db430c" shape=record label="{21e840b706...|db430c34a6...}"]
}
"e664d6d3e6..." -> "754737e128..." []
"b2185fefe5..." -> "65462bd1dc..." []
"21e840b706..." -> "fda2951a85..." []
subgraph lvl4 {
rank=same
"4"
"97769ce1e5..." [color="#1ad3b4" shape=record label="{97769ce1e5...|1ad3b44c9e...}"]
"0cda5ecdc9..." [color="#e6c1e8" shape=record label="{0cda5ecdc9...|e6c1e846bc...}"]
"f7797f30ae..." [color="#db430c" shape=record label="{f7797f30ae...|db430c34a6...}"]
}
"97769ce1e5..." -> "e664d6d3e6..." []
"0cda5ecdc9..." -> "b2185fefe5..." []
"f7797f30ae..." -> "21e840b706..." []
subgraph lvl5 {
rank=same
"5"
"4c631f0c6a..." [color="#1ad3b4" shape=record label="{4c631f0c6a...|1ad3b44c9e...}"]
"6202221ebb..." [color="#e6c1e8" shape=record label="{6202221ebb...|e6c1e846bc...}"]
"8a7c674316..." [color="#db430c" shape=record label="{8a7c674316...|db430c34a6...}"]
}
"4c631f0c6a..." -> "97769ce1e5..." []
"6202221ebb..." -> "0cda5ecdc9..." []
"8a7c674316..." -> "f7797f30ae..." []
subgraph lvl6 {
rank=same
"6"
"14a38ca3a4..." [color="#1ad3b4" shape=record label="{14a38ca3a4...|1ad3b44c9e...}"]
"e5269a7c93..." [color="#e6c1e8" shape=record label="{e5269a7c93...|e6c1e846bc...}"]
"6301adcbae..." [color="#db430c" shape=record label="{6301adcbae...|db430c34a6...}"]
}
"14a38ca3a4..." -> "4c631f0c6a..." []
"e5269a7c93..." -> "6202221ebb..." []
"6301adcbae..." -> "8a7c674316..." []
subgraph lvl7 {
rank=same
"7"
"f8952b5024..." [color="#e6c1e8" shape=record label="{f8952b5024...|e6c1e846bc...}"]
"0c87faf68d..." [color="#1ad3b4" shape=record label="{0c87faf68d...|1ad3b44c9e...}"]
"b2f9bf40af..." [color="#db430c" shape=record label="{b2f9bf40af...|db430c34a6...}"]
}
"f8952b5024..." -> "e5269a7c93..." []
"0c87faf68d..." -> "b2185fefe5..." []
"0c87faf68d..." -> "14a38ca3a4..." []
"b2f9bf40af..." -> "6301adcbae..." []
subgraph lvl8 {
rank=same
"8"
"e004b5f123..." [color="#e6c1e8" shape=record label="{e004b5f123...|e6c1e846bc...}"]
"cff175d457..." [color="#db430c" shape=record label="{cff175d457...|db430c34a6...}"]
}
"e004b5f123..." -> "f8952b5024..." []
"cff175d457..." -> "b2f9bf40af..." []
subgraph lvl9 {
rank=same
"9"
"a7a21222e5..." [color="#e6c1e8" shape=record label="{a7a21222e5...|e6c1e846bc...}"]
"7e5dad6dbf..." [color="#db430c" shape=record label="{7e5dad6dbf...|db430c34a6...}"]
}
"a7a21222e5..." -> "e004b5f123..." []
"7e5dad6dbf..." -> "cff175d457..." []
subgraph lvl10 {
rank=same
"10"
"0389e6efb7..." [color="#e6c1e8" shape=record label="{0389e6efb7...|e6c1e846bc...}"]
"de2f0def42..." [color="#db430c" shape=record label="{de2f0def42...|db430c34a6...}"]
}
"0389e6efb7..." -> "a7a21222e5..." []
"de2f0def42..." -> "7e5dad6dbf..." []
subgraph lvl11 {
rank=same
"11"
"65881caaeb..." [color="#e6c1e8" shape=record label="{65881caaeb...|e6c1e846bc...}"]
"30544ff802..." [color="#db430c" shape=record label="{30544ff802...|db430c34a6...}"]
}
"65881caaeb..." -> "0389e6efb7..." []
"30544ff802..." -> "de2f0def42..." []
subgraph lvl12 {
rank=same
"12"
"20c6d8b1a4..." [color="#e6c1e8" shape=record label="{20c6d8b1a4...|e6c1e846bc...}"]
"0d83313112..." [color="#db430c" shape=record label="{0d83313112...|db430c34a6...}"]
}
"20c6d8b1a4..." -> "65881caaeb..." []
"0d83313112..." -> "30544ff802..." []
subgraph lvl13 {
rank=same
"13"
"9b91555903..." [color="#e6c1e8" shape=record label="{9b91555903...|e6c1e846bc...}"]
"e43db8ddf5..." [color="#db430c" shape=record label="{e43db8ddf5...|db430c34a6...}"]
}
"9b91555903..." -> "20c6d8b1a4..." []
"e43db8ddf5..." -> "0d83313112..." []
subgraph lvl14 {
rank=same
"14"
"63f5b885ac..." [color="#e6c1e8" shape=record label="{63f5b885ac...|e6c1e846bc...}"]
"a3fd8825b2..." [color="#1ad3b4" shape=record label="{a3fd8825b2...|1ad3b44c9e...}"]
}
"63f5b885ac..." -> "9b91555903..." []
"a3fd8825b2..." -> "e43db8ddf5..." []
subgraph lvl15 {
rank=same
"15"
"87a58cbd1a..." [color="#e6c1e8" shape=record label="{87a58cbd1a...|e6c1e846bc...}"]
}
"87a58cbd1a..." -> "63f5b885ac..." []
subgraph lvl16 {
rank=same
"16"
"dd11cbc8dc..." [color="#e6c1e8" shape=record label="{dd11cbc8dc...|e6c1e846bc...}"]
}
"dd11cbc8dc..." -> "87a58cbd1a..." []
subgraph lvl17 {
rank=same
"17"
"9207e959d6..." [color="#e6c1e8" shape=record label="{9207e959d6...|e6c1e846bc...}"]
}
"9207e959d6..." -> "dd11cbc8dc..." []
subgraph lvl18 {
rank=same
"18"
"a87be9d496..." [color="#e6c1e8" shape=record label="{a87be9d496...|e6c1e846bc...}"]
}
"a87be9d496..." -> "9207e959d6..." []
subgraph lvl19 {
rank=same
"19"
"f7842ffcc1..." [color="#e6c1e8" shape=record label="{f7842ffcc1...|e6c1e846bc...}"]
}
"f7842ffcc1..." -> "a87be9d496..." []
subgraph lvl20 {
rank=same
"20"
"ea4e333f1a..." [color="#e6c1e8" shape=record label="{ea4e333f1a...|e6c1e846bc...}"]
}
"ea4e333f1a..." -> "f7842ffcc1..." []
"ea4e333f1a..." -> "14a38ca3a4..." []
subgraph lvl21 {
rank=same
"21"
"615c23476b..." [color="#e6c1e8" shape=record label="{615c23476b...|e6c1e846bc...}"]
}
"615c23476b..." -> "ea4e333f1a..." []
subgraph lvl22 {
rank=same
"22"
"d7105e1958..." [color="#e6c1e8" shape=record label="{d7105e1958...|e6c1e846bc...}"]
}
"d7105e1958..." -> "615c23476b..." []
subgraph lvl23 {
rank=same
"23"
"67a01e7ddf..." [color="#e6c1e8" shape=record label="{67a01e7ddf...|e6c1e846bc...}"]
}
"67a01e7ddf..." -> "d7105e1958..." []
subgraph lvl24 {
rank=same
"24"
"9984ca3ef1..." [color="#e6c1e8" shape=record label="{9984ca3ef1...|e6c1e846bc...}"]
}
"9984ca3ef1..." -> "67a01e7ddf..." []
subgraph lvl25 {
rank=same
"25"
"0f85d26de3..." [color="#e6c1e8" shape=record label="{0f85d26de3...|e6c1e846bc...}"]
}
"0f85d26de3..." -> "9984ca3ef1..." []
subgraph lvl26 {
rank=same
"26"
"515fba8847..." [color="#e6c1e8" shape=record label="{515fba8847...|e6c1e846bc...}"]
}
"515fba8847..." -> "0f85d26de3..." []
subgraph lvl27 {
rank=same
"27"
"700962330a..." [color="#e6c1e8" shape=record label="{700962330a...|e6c1e846bc...}"]
"8f5dd31f1c..." [color="#1ad3b4" shape=record label="{8f5dd31f1c...|1ad3b44c9e...}"]
}
"700962330a..." -> "515fba8847..." []
"700962330a..." -> "0c87faf68d..." []
"8f5dd31f1c..." -> "515fba8847..." []
"8f5dd31f1c..." -> "0c87faf68d..." []
subgraph lvl28 {
rank=same
"28"
"fc635f4c6a..." [color="#e6c1e8" shape=record label="{fc635f4c6a...|e6c1e846bc...}"]
}
"fc635f4c6a..." -> "700962330a..." []
subgraph lvl29 {
rank=same
"29"
"30ddfc20ee..." [color="#e6c1e8" shape=record label="{30ddfc20ee...|e6c1e846bc...}"]
}
"30ddfc20ee..." -> "fc635f4c6a..." []
subgraph lvl30 {
rank=same
"30"
"72b34913f3..." [color="#e6c1e8" shape=record label="{72b34913f3...|e6c1e846bc...}"]
}
"72b34913f3..." -> "30ddfc20ee..." []
subgraph lvl31 {
rank=same
"31"
"cdc16d8ff0..." [color="#e6c1e8" shape=record label="{cdc16d8ff0...|e6c1e846bc...}"]
}
"cdc16d8ff0..." -> "72b34913f3..." []
subgraph lvl32 {
rank=same
"32"
"10073807ed..." [color="#1ad3b4" shape=record label="{10073807ed...|1ad3b44c9e...}"]
}
"10073807ed..." -> "cdc16d8ff0..." []
"10073807ed..." -> "8f5dd31f1c..." []
subgraph timeseries {
"0" [shape=plaintext]
"1" [shape=plaintext]
"2" [shape=plaintext]
"3" [shape=plaintext]
"4" [shape=plaintext]
"5" [shape=plaintext]
"6" [shape=plaintext]
"7" [shape=plaintext]
"8" [shape=plaintext]
"9" [shape=plaintext]
"10" [shape=plaintext]
"11" [shape=plaintext]
"12" [shape=plaintext]
"13" [shape=plaintext]
"14" [shape=plaintext]
"15" [shape=plaintext]
"16" [shape=plaintext]
"17" [shape=plaintext]
"18" [shape=plaintext]
"19" [shape=plaintext]
"20" [shape=plaintext]
"21" [shape=plaintext]
"22" [shape=plaintext]
"23" [shape=plaintext]
"24" [shape=plaintext]
"25" [shape=plaintext]
"26" [shape=plaintext]
"27" [shape=plaintext]
"28" [shape=plaintext]
"29" [shape=plaintext]
"30" [shape=plaintext]
"31" [shape=plaintext]
"32" [shape=plaintext]
"0" -> "1" []
"1" -> "2" []
"2" -> "3" []
"3" -> "4" []
"4" -> "5" []
"5" -> "6" []
"6" -> "7" []
"7" -> "8" []
"8" -> "9" []
"9" -> "10" []
"10" -> "11" []
"11" -> "12" []
"12" -> "13" []
"13" -> "14" []
"14" -> "15" []
"15" -> "16" []
"16" -> "17" []
"17" -> "18" []
"18" -> "19" []
"19" -> "20" []
"20" -> "21" []
"21" -> "22" []
"22" -> "23" []
"23" -> "24" []
"24" -> "25" []
"25" -> "26" []
"26" -> "27" []
"27" -> "28" []
"28" -> "29" []
"29" -> "30" []
"30" -> "31" []
"31" -> "32" []
}
}
|
| To see the visualization, past output in http://viz-js.com/ |
|
| To add graph to a Jira ticket save as a .txt file and attach to the ticket |